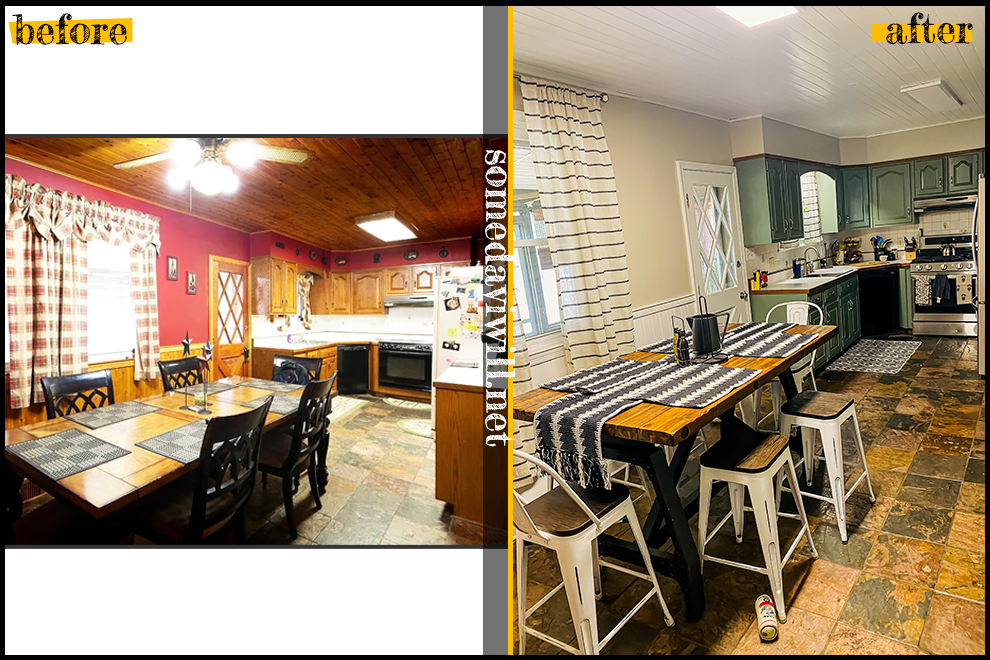
If you saw the first week “kitchen edition” then you probably know our kitchen was a bit dark, and a little unwelcoming when we settled. Our immediate efforts to lighten the room up consisted of painting some wood paneling and covering the dark red wall paint with a natural “greige” that complimented the natural slate tile. (btw, not my favorite choice. There are way too many times I stop and wonder if there’s “dog goodies” on my floor.)
So, I decided that I was going to attempt to paint the cabinets. The cabinets themselves are wonderfully constructed, solid wood – do they have bells and whistles like soft close hardware? Nah. But they’re not particle board. Are they my favored shaker cabinet front? Nope. But with the right color – we can turn ‘old country buffet’ into something bright, calming and OURS.
And that’s just what I did – I scoured Will’s Sherwin Williams paint swatch book – but couldn’t come up with the right color. I knew that in our end game kitchen, we wanted “Eucalyptus green lowers and white uppers” – which I did not intend to paint these cabinets white – ever. There’s too much white in the kitchen as it is – I was too afraid that white wouldn’t match the already white – since we painted everything during the trim paint debacle.
Now – are you “supposed” to paint cabinets with standard latex paint? I don’t really think so – special “cabinet” paint is usually sold to you – and for good reason. If done right, it can dry harder and last longer (for years and years). The thing is – I don’t need “years and years” to come out of this – I just need a few good ones, while we plan and remodel around the kitchen before we actually GET to the kitchen. So, here it is – in way less words that I used to lead up to it.
WHAT DID WE DO?
- I cleaned everything with TSP – anything the paint touched, TSP & elbow grease. TSP will remove any oil or grease build up that could prevent paint from sticking. Our cabinets were still glossy af – so it took some stuck splatters off really easily. It even felt like it was pulling out some of the stain – but that could have just been dirt.
- I sanded the dickens out of everything. This was the hardest part, and I feel like it took longer to do this than it did to paint. Sand and sand and sand. you can start with a low grit – but it’s best that you always finish with 320 for a smooth soft surface for your paint.
- I windexed and dusted – with cabinet fronts that aren’t just flat… sanding dust is going to get stuck in cracks and prevent paint – windex will take it right now and make your surface beautiful for paint.
NOW, HERE’S WHERE I BREAK THE LAW
- I poured a measured amount of my Sherwin William’s FARM TO TABLE (An HGTV color) in OVATION plus and I added FLOETROL to it. Floetrol is an additive that will help your paint dry flatter when using a brush, the brush strokes almost melt away as it dries. I’ve heard it WILL void your warranty on your paint, so add with caution. I have also heard that it can contribute to the yellowing of paint over time. I can’t confirm it, but plenty of experts have said this – it may be true. I am painting green cabinets. Yellowing will only make it more green – so I did not care. I’ve heard there’s a similar product that comes without the yellowing – but I am loyal to floetrol. Just don’t use it if you need a precise color or are using a bright white – you may end up with a beige later.
- I painted with a brush – all my cabinets and bases. Section by section. Removing them from the wall – I only did the fronts because I dont need a seamless look – these cabinets aren’t going to be here for more than 5 more years. and the wood itself wasn’t “ugly”.
- It took 2-3 good coats on each cabinet to get the coverage I wanted.
- Once it “dried”…
I BROKE THE LAW AGAIN
- I coated everything with MINWAX polyacrylic (water-based) – another no-no because it does, definitely 100% contribute to yellowing if you don’t thin it, sand it, paint more, sand it, paint more sand it – even then, probably yellowing. I wanted something to “protect” the cabinets because after all – they’re used daily. I don’t want to run around touching everything up every time I decide to clean my kitchen.
Listen – what I did worked for me – and I LOVE the results. For anyone who wants to get a few more years of life out of their cabinets but still get a “new kitchen” vibe – there’s nothing wrong with this process. Some people SWEAR by the above. Can you buy specific cabinet paint? Yep. Is it probably the same ingredients? I bet it is.
I also want you to know that before I was able to publish this post originally… I have now painted more cabinets than I would like to admit, and a sprayer is 1000% the way to go for your paint and then brush on your topcoat. Specifically, your poly – with a Wooster silver tip brush. To ensure you make that brush last a lifetime – DO NOT leave poly sitting on it for any length of time. Wash immediately. Paint a coat, let it dry – sand with a high grit paper, coat again – you can do this A LOT but I suggest at least 3, 4 or 5 for “high traffic”.


LINKS FOR THE PRODUCTS FEATURED:
Cabinet Paint Link: HGTV HOME by Sherwin Williams – Farm to Table –
TSP Cleaner Link: TSP Concentrate (amazon)
Amazon: Clean Window Twill Stripe Sheer Curtain (Window)
Amazon: Clean Window Twill Stripe Sheer Curtain (Cafe’)
Amazon: Ivilon Drapery Treatment Window
Amazon: Boho Style Placemats by Collive
Amazon: Boho Style Table Runner by Collive
Amazon: Breadbox by LARS NYSOM
SomedayIWill is a participant in the Amazon Services LLC Associates Program, an affiliate advertising program designed to provide a means for sites to earn advertising fees by advertising and linking to Amazon.com.